Summary: In this tutorial, you’ll learn how to download, install, and configure Oracle 23ai database using Oracle VirtualBox
Prerequisites #
Your computer should meet the following requirements:
- Windows 11.
- Having at least 8GB of RAM.
- 20GB free disk space.
Oracle VirtualBox #
Oracle VirtualBox is a free software that allows you to run other operating systems, such as Linux and Windows, inside your computer as if they were regular applications. In other words, VirtualBox lets you run a virtual computer or virtual machine (VM) within your physical computer.
Step 1: Download Oracle VirtualBox #
- Launch your web browser and go to the VirtualBox official website https://www.virtualbox.org/
- Click the “Download VirtualBox” link.
- Under “VirtualBox Platform Packages”, select the Windows hosts file to download.
- Wait for the download to complete.
Step 2. Install Oracle VirtualBox #
- Execute the downloaded installer file.
- Click Next → Accept the license agreement → Next.
- Keep the default settings.
- Click “Yes” if prompted for network installation (required for connecting from your computer).
- Click Install → Wait for the process to complete.
- Check “Start Oracle VirtualBox after installation” → Click Finish.
Oracle 23AI Database #
Oracle 23ai is the latest version of Oracle Database that combines relational database management with built-in AI features. If you want to get the Oracle 23AI database server up and running quickly, you can use a pre-configure image.
Step 1: Download the Oracle 23AI Database OVA File #
- Open your web browser and go to Oracle’s official website.
- Navigate to the Get Started section.
- Locate and download the Oracle 23AI OVA file, a pre-configured virtual machine.
Step 2: Import the OVA File into VirtualBox #
- Open your VirtualBox.
- In VirtualBox, go to File → Import Appliance.
- Click “Choose File” and choose the Oracle 23AI OVA file you downloaded earlier.
- Click “Next” and review the settings. To have a better performance, you can increase the memory (RAM).
- Click “Import” and wait for the process to complete.
Step 3. Configure Virtual Machine Settings #
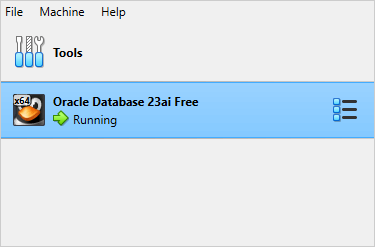
First, select the Oracle Database 23ai Free:
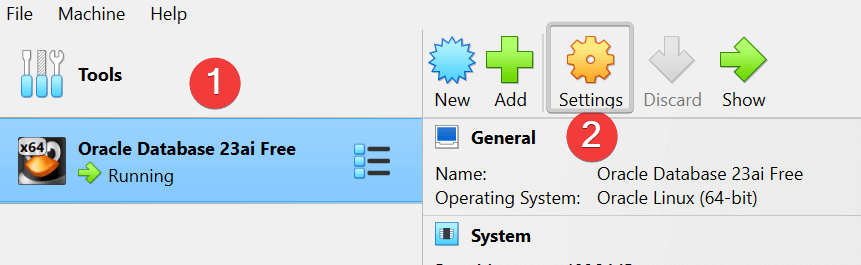
Second, click the Settings button on VirtualBox:
Third, Select the Network, check the Enable Network Adapter, and Change the Attached to to “Bridge Adapter”:
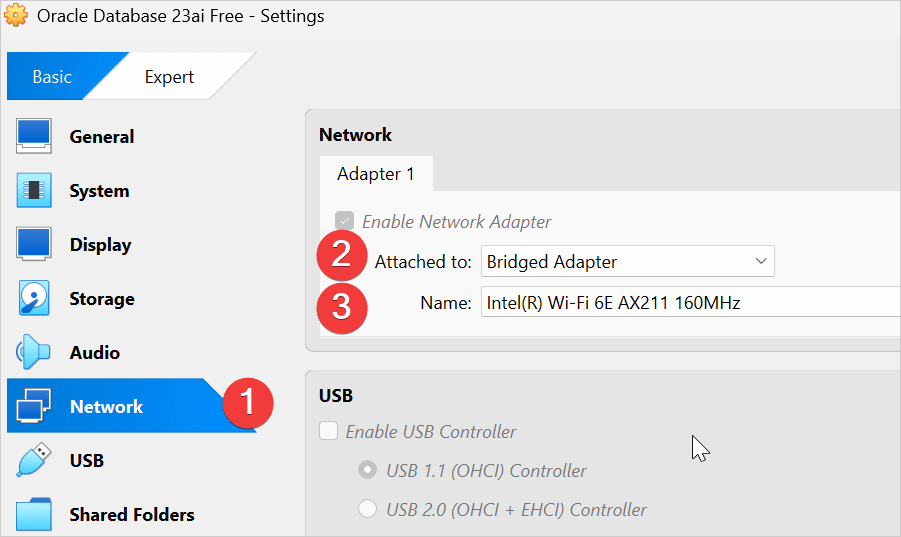
This setting will allow you to connect to the Oracle Database 23ai on the virtual machine from your computer.
Step 4: Start the Oracle 23ai Virtual Machine #
- Select the Oracle Database 23ai Free and click “Start”.
- Please wait for the system to start. Typically, it’ll take a few minutes.
- The virtual machine will automatically log in as the Oracle user.
Once the virtual machine starts, it’ll open Oracle Documentation in a web browser.
Here’s important information:
| Parameter | Value |
|---|---|
| Oracle SID | free |
| Pluggable DB | freepdb1 |
Open the terminal, and type the following command to get the IP address:
ip aIt’ll return a lot of information. The IP address will look like this:
192.168.2.43Code language: CSS (css)To verify the IP address, you can open a PowerShell or Command Prompt on your computer and ping this IP:
- Press
Cmd+Rto open the Run window. - Type
cmdand pressEnter. It’ll launch a Command Prompt. - Ping the IP address by typing the following command:
ping 192.168.2.43Code language: CSS (css)If you see the reply, it means you got the correct IP address:
C:\>ping 192.168.2.43

Pinging 192.168.2.43 with 32 bytes of data:
Reply from 192.168.2.43: bytes=32 time<1ms TTL=64
Reply from 192.168.2.43: bytes=32 time=1ms TTL=64
Reply from 192.168.2.43: bytes=32 time=1ms TTL=64
Reply from 192.168.2.43: bytes=32 time=1ms TTL=64Code language: HTML, XML (xml)
Step 5. Allow remote connection #
By default, you can connect to the Oracle database server from the localhost, meaning the virtual machine.
You need to configure the Oracle listener to allow remote connections, such as from your computer to the virtual machine.
First, open a text editor on your virtual machine.
Second, open the listener file:
/opt/oracle/product/23ai/dbhomeFree/network/admin/listener.oraIt has a section like:
LISTENER =
  (DESCRIPTION_LIST =
    (DESCRIPTION =
      (ADDRESS = (PROTOCOL = TCP)(HOST = localhost)(PORT = 1521))
      (ADDRESS = (PROTOCOL = IPC)(KEY = EXTPROC1521))
    )
  )
The HOST = localhost tells Oracle Database Server to accept only local connections. You need to change the localhost to 0.0.0.0:
LISTENER =
  (DESCRIPTION_LIST =
    (DESCRIPTION =
      (ADDRESS = (PROTOCOL = TCP)(HOST = 0.0.0.0)(PORT = 1521))
      (ADDRESS = (PROTOCOL = IPC)(KEY = EXTPROC1521))
    )
  )
Save the file, and you’re done with remote connection configuration.
SQL Developer #
SQL Developer is a free graphical user interface (GUI) tool that enables you to connect to an Oracle database, run SQL queries, and perform other database-related tasks.
Step 1. Download SQL Developer #
- Open your web browser and go to the Oracle SQL Developer page.
- Download the Windows 64-bit with JDK 17 included. It is a portable version, so you don’t have to set up.
- Extract the download file to a directory like D:\sqldeveloper
Step 2. Connect to the Oracle Database 23ai from SQL Developer #
- Launch SQL Developer (sqldeveloper.exe)
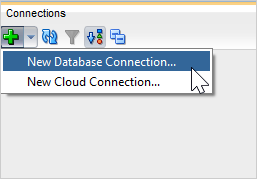
From the Connection pane, click New Database Connection…:
Enter the connection parameters:
Name: Oracle 23ai. You can choose any name you want
User Info:
- username: system
- password: oracle
Check the Save Password checkbox.
Details:
- Hostname: 192.168.2.43. Replace it with your virtual machine’s IP address.
- Port: 1521
- SID: free
The connection parameters look like the following picture:
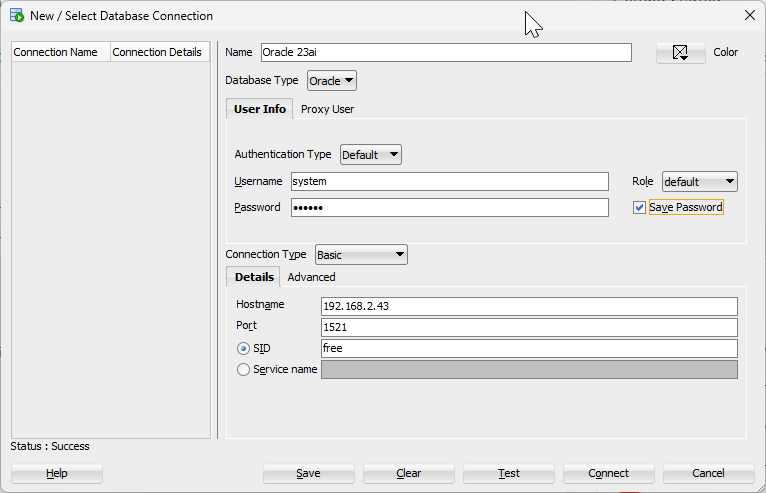
Click the Test button to test the connection. If you see the’ Success’ message, it means you are ready to connect to the Oracle Database server.
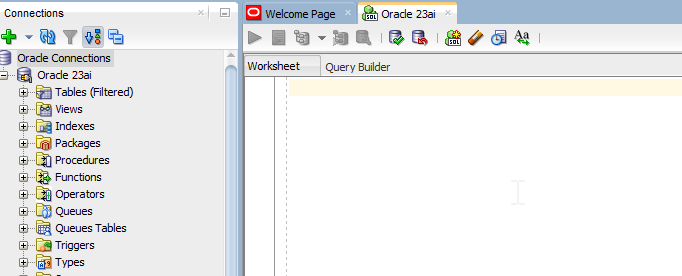
Click the Connect button to connect. SQL Developer will look like this:
Step 3. Executing SQL Statements #
SQL is a language you use to communicate with the Oracle database. SQL Developer allows you to execute a single SQL statement and multiple SQL statements.
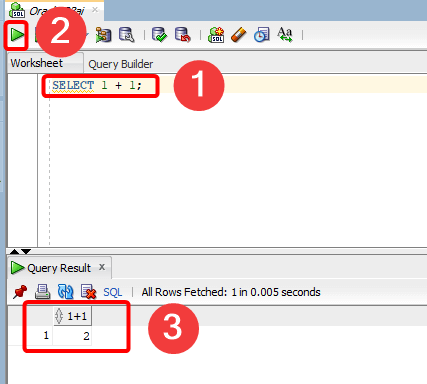
Here are the steps for executing a single SQL statement:
First, enter a statement SELECT 1 + 1; in the editor (1). This is a simple SQL statement that returns the sum of 1 and 1.
Second, click the Run Statement button (2) to execute the statement. SQL Developer will execute the statement at the cursor and display the result on the grid (3)
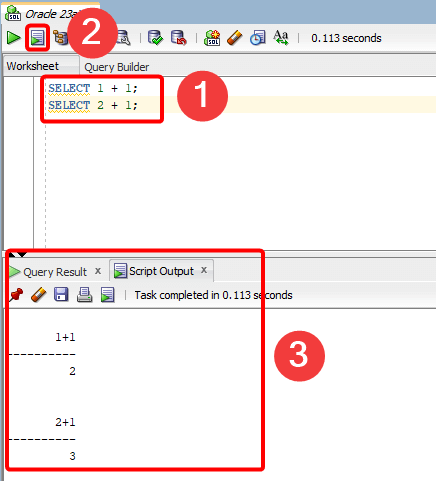
To execute multiple SQL statements, you follow these steps:
First, enter multiple statements in the editor (1).
Second, click the Run Script button (2). The SQL developer will execute all the statements in the editor and display the output in the script output (text-based).
Summary #
- VirtualBox enables you to run an operating system on your computer.
- The Oracle Database 23ai image enables you to bring the Oracle Database Server up and running quickly.
- SQL Developer enables you to interact with the Oracle Database Server, allowing you to execute queries.