Summary: in this tutorial, you will learn how to create the OT sample database in your Oracle database server.
Note that the commands in this tutorial may not be familiar to you, it will be fine. First, you just need to follow the instructions step by step to create the sample database. Then, you can learn each command in the next tutorials.
Creating a new user and granting privileges
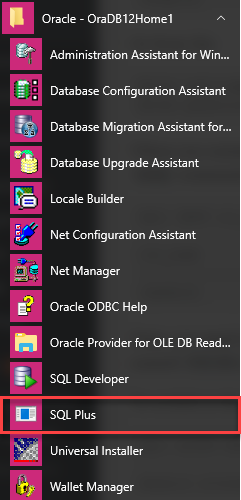
First, launch the SQL*plus program the command line:
>sqlplusCode language: SQL (Structured Query Language) (sql)Or from the installation directory of the start menu:

Once the SQL*Plus is launched, it will prompt you for a username and password. Go ahead to log in as the sys user with the password that you entered during the installation of the Oracle database server
Enter user-name: sys as sysdba
Enter password:Code language: JavaScript (javascript)
When you connect to the Oracle database server, you connect to a container database (CDB) named ROOT. To show the current database, you use the SHOW command:
SQL> SHOW con_name;

CON_NAME
------------------------------
CDB$ROOTCode language: SQL (Structured Query Language) (sql)
Next, you need to switch to a pluggable database. Noted that during the installation of Oracle, we already created a pluggable database named PDFORCL .
To switch to the PDBORCL pluggable database, you use the following statement:
SQL> ALTER SESSION SET CONTAINER = pdborcl;

Session altered.Code language: SQL (Structured Query Language) (sql)
Note that if you use a different pluggable database, feel free to change it in the command.
If you execute the show command again, the database now is PDBORCL.
SQL> SHOW con_name;

CON_NAME
------------------------------
PDBORCLCode language: SQL (Structured Query Language) (sql)
Before creating a new user, you need to change the database to open by executing the following command:
SQL> ALTER DATABASE OPEN;

Database altered.Code language: SQL (Structured Query Language) (sql)
Then, you create a new user for creating the sample database in the pluggable database using the following CREATE USER statement:
SQL> CREATE USER OT IDENTIFIED BY Orcl1234;

User created.Code language: SQL (Structured Query Language) (sql)
The above statement created a new user named OT with a password specified after the IDENTIFIED BY clause, which is Orcl1234 in this case.
After that, you grant privileges to the OT user by using the following GRANT statement:
SQL> GRANT CONNECT, RESOURCE, DBA TO OT;

Grant succeeded.Code language: SQL (Structured Query Language) (sql)
Finally, you can connect to the pluggable database ( PDBORCL) using the OT user account. Type the password ( Orcl1234) for the OT user when SQL*plus prompts you for the password.
SQL> CONNECT ot@pdborcl
Enter password:
Connected.Code language: SQL (Structured Query Language) (sql)
Note that OT user only exists in the PDBORCL pluggable database, therefore, you must explicitly specify the username as ot@pdborcl in the CONNECT command.
Creating database tables
Before going forward, you need to download the Oracle sample database.
To create tables in the sample database, you need to execute the statements in the ot_schema.sql file from SQL*plus.
In order to execute SQL statements in a file from SQL*plus, you use the following command:
SQL>@path_to_sql_fileCode language: SQL (Structured Query Language) (sql)Suppose the ot_schema.sql file is located in the c:\dbsample\ directory, you execute the statement below.
SQL>@c:\dbsample\ot_schema.sqlCode language: SQL (Structured Query Language) (sql)Once the statement completes, you can verify whether the tables were created successfully or not by listing the tables owned by the OT user. The following is the statement to do so.
SQL> SELECT table_name FROM user_tables ORDER BY table_name;

TABLE_NAME
--------------------------------------------------------------------------------
CONTACTS
COUNTRIES
CUSTOMERS
EMPLOYEES
INVENTORIES
LOCATIONS
ORDERS
ORDER_ITEMS
PRODUCTS
PRODUCT_CATEGORIES
REGIONS
WAREHOUSES

12 rows selected.Code language: SQL (Structured Query Language) (sql)
In this statement, we selected the values in the table_name column from the user_tables table and sorted the table names alphabetically. As you see, 12 table names returned as expected.
Now, you are ready to load data into these tables.
Loading data into tables
To load data into the tables, you execute the statements in the ot_data.sql file as follows:
SQL>@c:\dbsample\ot_data.sqlCode language: SQL (Structured Query Language) (sql)If you don’t see any error messages, it means that the data has been loaded successfully.
You can also verify whether data has been loaded successfully by using the SELECT statement. For example, to get the number of rows in the contacts table, you use COUNT(*) function as shown in the following statement:
SQL> SELECT COUNT(*) FROM contacts;

  COUNT(*)
----------
       319Code language: SQL (Structured Query Language) (sql)
The query returns 319 indicating that the contacts table has 319 rows.
By replacing the table name ( contacts) by another table name, you can check data in another table. This is a good exercise for you if this is the first time you have worked with Oracle.
In this tutorial, you have learned step by step how to create the OT sample database in the Oracle Database server. Now, you should be ready to connect to the Oracle sample database for practice.